Here are our new blog posts:

Film online lessons on a budget (for teachers)
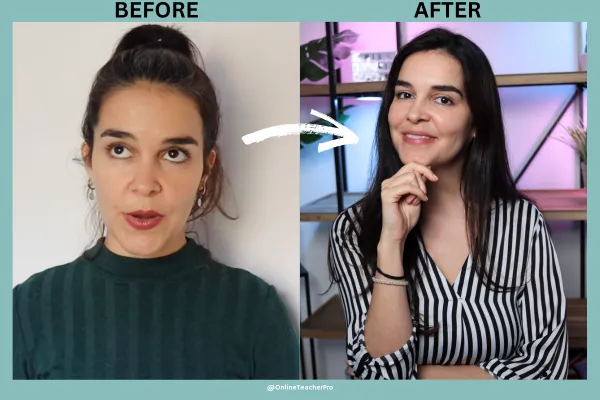
How to Film High-Quality Lessons Without Expensive Equipment
Creating professional-looking video lessons doesn't require a Hollywood budget. With strategic planning and some budget-friendly tools, you can deliver high-quality content that engages your students and showcases your expertise. Here's a step-by-step guide to help you get started:
1. Choose the Right Space
Lighting: Natural light is your best friend. Film during the day near a window, but avoid direct sunlight to prevent harsh shadows. Use sheer curtains if needed to diffuse the light.
Background: Keep it simple and clutter-free. A neutral wall or a tidy bookshelf works well. Avoid distracting elements that pull attention away from your lesson.

2. Optimize Your Camera
Use Your Smartphone: Modern smartphones are equipped with excellent cameras. Use the back camera for better quality.
Stabilize the Shot: Invest in a basic tripod (starting around $20) or create a DIY stand to keep your footage steady.
Frame Your Shot: Position yourself in the center with some headroom. Keep your eyes at about one-third of the screen's height for a professional composition.
3. Enhance Audio Quality
Use a Microphone: A simple clip-on mic (around $20-$30) significantly improves sound quality compared to built-in microphones.
Reduce Background Noise: Film in a quiet space. Turn off fans, AC units, or other noisy appliances. Adding rugs or curtains can help absorb echo.
Test Before Filming: Always record a short clip to ensure your audio is clear and balanced. This is important, believe me! I have had to record everything again more than once, because I skipped this step and there was a problem with the sound at the end...*sigh*.
4. Leverage Affordable Lighting
If natural light isn’t sufficient, consider an inexpensive ring light or LED panel (starting at $30). These provide consistent, soft lighting.
Use a desk lamp with a soft white bulb as a cost-effective alternative. Position it at a 45-degree angle to your face for even illumination.
5. Edit Like a Pro (on a Budget)
Free Tools: Use free editing software like iMovie (Mac), Windows Video Editor (PC), or apps like CapCut for smartphones. I personally used iMovie for a long time, because I owned a Mac, but I believe these other softwares are also good to start.
Enhance Clarity: Adjust brightness, contrast, and color balance. Trim unnecessary parts to keep your lesson concise.
Add Captions: This increases accessibility and helps students follow along. My students really liked it when I added subtitles/ captions to my videos, and my engagement went up!
6. Present Confidently
Practice: Rehearse your content to reduce filler words and ensure smooth delivery. On the other hand, don't become too robotic, because this takes the spontaneity out of the videos, and students don't like that. They like to see that there is a person on the other side, not just a robot or a program that can teach them in auto mode. This is why they came to you. They likely enjoyed your personality, and therefore decided to follow you and have lessons with you.
Dress Appropriately: If you want your video to have a formal appearance, opt for solid, neutral colors to minimize distractions. Avoid stripes or bright, bold patterns, as these can look unflattering or distracting on camera. However, if your style leans toward something more vibrant and unique, feel free to embrace colors like yellow or orange—your personality should shine through in your wardrobe choices. The key is to experiment and find what works best for you. Take the time to test different outfits on camera to determine which colors and styles complement your on-screen presence and reflect your brand authentically. But don't worry too much at first, and just go for it. You will likely find your style and online persona naturally, as you go.
Engage Your Audience: Look directly at the camera to simulate eye contact, but don't stare too long. Sometimes, look away as if you are thinking about something, because this will help make you look more natural, as if you were speaking to someone in real life. Smile and vary your tone to maintain interest.
7. Experiment and Evolve
Start with what you have and gradually upgrade as your budget allows. For example, upgrade your smartphone camera to a DSLR or invest in better lighting as you grow. But don't let this hold you back! I started with almost no equipment, except for my laptop. Many people get stuck because they think they have to have the perfect material, but this is really not true!
Seek feedback from viewers or students to improve your future videos.
Suggested Equipment List
Smartphone: Most modern smartphones with 1080p or 4K recording.
Lavalier Mic: BOYA BY-M1 or Rode smartLav+.
Tripod: AmazonBasics tripod or GorillaPod.
Ring Light: Neewer 10" LED ring light.
By focusing on these essentials, you can produce professional-looking videos that resonate with your audience without breaking the bank. The key is to start small, work with what you have, and consistently refine your process. I started like this, and gained followers, and started selling courses, even without fancy equipment. Unless you are teaching about lighting, or videography, or something along those lines, your followers will not really care if you do not have top-notch equipment. They are there for the content you provide, so focus on delivering high-quality content, and the rest will come with time!
Want more tips? Leave a comment below or check out our other posts on growing your online teaching business!
Copyright © Online Teacher Pro - All Rights Reserved
Terms | Privacy Policy

